Drag and Drop in Javascript
Finished Example
Move Me!
Prep
-
The only necessary thing that you need before you start is a script with a source linked to a javascript libarary. i am using Jquery version 2.1.3.
Add it to the top of your page like so:
<script src="Scripts/jquery-2.1.3.js"></script>

Setting Up The Divs
-
First we will begin by laying out the Divs which will be used for Dragging objects, as well as the "Hole" that will recieve the objects.
-
Start by adding an outer div which will act as the table.
Set the class of your div so you can style it. In this example i will use the id "tableDiv" and the class "table".
<div id="tableDiv" class="table"></div>
-
Next add 4 identical divs to the inside of of the "tableDiv". (You can add as many as you like, but for this example we will just use 4).
Give each one a class that you will later use to style and apply necessary javascript. I will use the class "hole"
Your div's should now look like the following:
<div id="tableDiv" class="table">
<div class="hole"></div>
<div class="hole"></div>
<div class="hole"></div>
<div class="hole"></div>
</div> -
Now, inside each of the "hole" divs add another div.
Each of these divs should have a class and have the "draggable" attribute set to true. For these i will use the class "innerHole".
Inside one of the divs you can place a label, image, or anything that you want to be dragged around. I will be using a label.
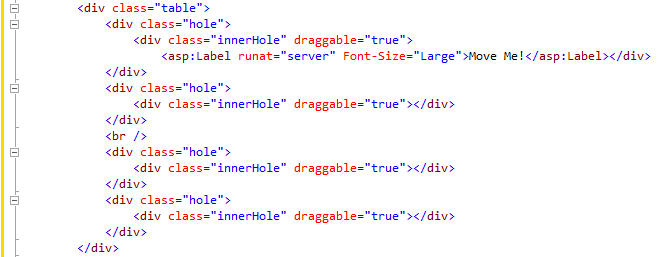
Your completed divs should look like the following:
<div id="tableDiv" class="table">
<div class="hole">
<div class="innerHole" draggable="true">
<asp:Label runat="server" Font-Size="Large">Move Me!</asp:Label>
</div>
</div>
<div class="hole">
<div class="innerHole" draggable="true"></div>
</div>
<div class="hole">
<div class="innerHole" draggable="true"></div>
</div>
<div class="hole">
<div class="innerHole" draggable="true"></div>
</div>
</div>
- You now have your complete set of divs.
Styling
-
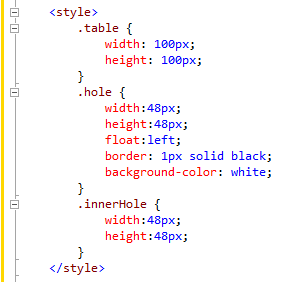
The styling of the divs is mostly up to you. I will post the styling that i used below for reference.
<style>
.table {
width: 100px;
height: 100px;
}
.hole {
width:48px;
height:48px;
float:left;
border: 1px solid black;
background-color: white;
}
.innerHole {
width:48px;
height:48px;
}
</style>
-
You will notice that i have the table set to be just big enough to hold each div and its border.
The "float:left;" is necessary for the table to take it's shape. as it will stick each div side by side.
Implementing the Drag and Drop
-
To begin, start by adding a script area, and adding a global var to the inside of it. FOr this example i will name my var draggedSquare.
This will be the variable that will hold the state of the square you are dragging.
Your code should look like this thus far:
<script type="text/javascript">
var $draggedSquare;
</script> -
Next we will define a function for the "$(document).ready()" that will apply each of the necessary methods based on the classes we assigned earlier.
$(document).ready(function () {
$('.innerHole').on('dragstart', dragging);
$('.innerHole').on('dragend', draggingEnded);
$('.hole').on('dragenter', preventDefault);
$('.hole').on('dragover', preventDefault);
$('.hole').on('drop', dropSquare); });
We will define each of these functions next.
-
Now we will define the dragging function, which will apply the class "dragging" necessary to drag the square as well as assign it to our global variable.
function dragging(e) {
$(e.target).addClass('dragging');
$draggedSquare = $(e.target);
}
-
Next is the draggingEnded function which will remove the class we assigned to the square.
function draggingEnded(e) {
$(e.target).removeClass('dragging');
}
-
Next is the preventDefault function which will cancel all default functionality from happening.
function preventDefault(e) {
e.preventDefault();
}
-
Finally is the dropSquare function, which will do the would of applying your draggedSquare to your choice of hole.
function dropSquare(e) {
$draggedSquare.detach();
$draggedSquare.appendTo($(e.target));
}
-
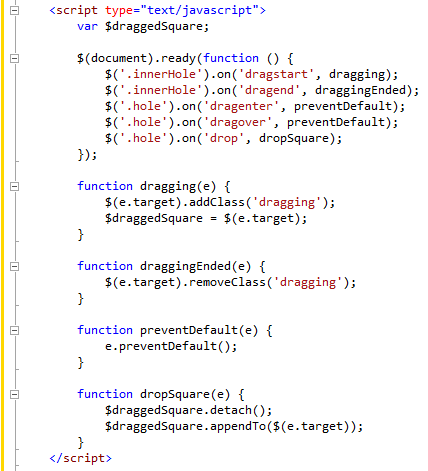
You should now have all the functions necessary for the drag and drop!
Your final script should look like this:
<script type="text/javascript">
var $draggedSquare;
$(document).ready(function () {
$('.innerHole').on('dragstart', dragging);
$('.innerHole').on('dragend', draggingEnded);
$('.hole').on('dragenter', preventDefault);
$('.hole').on('dragover', preventDefault);
$('.hole').on('drop', dropSquare);
});
function dragging(e) {
$(e.target).addClass('dragging');
$draggedSquare = $(e.target);
}
function draggingEnded(e) {
$(e.target).removeClass('dragging');
}
function preventDefault(e) {
e.preventDefault();
}
function dropSquare(e) {
$draggedSquare.detach();
$draggedSquare.appendTo($(e.target));
}
</script>
-
You should now have a functioning drag and drop table!