Popups with Faded Backgrounds
This Page will show you how to set up a popup with a faded background. Below is a sample of the final product.Setting Up The Popup
-
Start by creating 2 divs, one inside the other. Give them both an id. For this example, the outer div will be called overlay and the inner div will be called innerOverlay.
-
Next you will create a <style></style> section where you will layout the classes to format your popup and overlay.
-
You will need 3 classes total. For this examples, mine will be created as such:
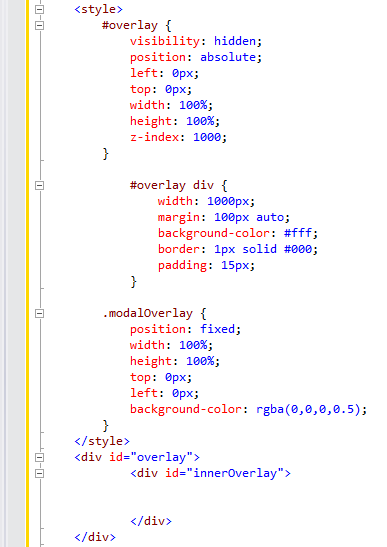
#overlay {
}
#overlay div {
}
.modalOverlay {
}
-
You may of course, customize your popup however you like. Though, there are 2 required attributes that you need.
The first being inside the #overlay class, where you will set the visibility to "hidden". For example:
#overlay {
visibility: hidden;
}
The second property will go inside the .modalOverlay class, where you will set the background color that will give you page the faded out look. For example:
.modalOverlay {
background-color: rgba(0,0,0,0.5); /* Will make a black background with 50% transparency */
}
For reference on how i set up all my classes in this example here is the completed <style> section:
Writing Script For The Popup
-
Next, you will need a javascript <script></script> section where you will put the code to activate/deactivate your popup and overlay.
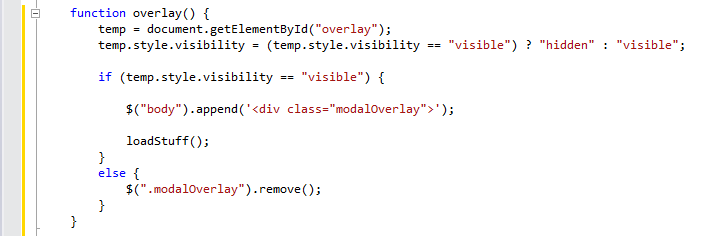
Inside this script section, add a function which will be called in order to start your popup. In this example i will call it overlay().
Inside your new function, add the following code to make your overlay visible/hidden:
temp = document.getElementById("overlay");
temp.style.visibility = (temp.style.visibility == "visible") ? "hidden" : "visible";
You may have noticed by now, that although we made a class called .modalOverlay, It is not being used anywhere. We will change that here.
We will be dynaically generating/removing the modalOverlay div based on the visibility of the overlay above as follows:
if (temp.style.visibility == "visible") {
$("body").append('<div class="modalOverlay">');
loadStuff();
}
else {
$(".modalOverlay").remove();
}
You will notice i added a call to a function called loadStuff() in the if statement.
I will discuss this function in the next step.
Populating Your Popup With Content
-
You will now create the loadStuff() function shown in the previous step.
This function will contain the code to add content to your popup, as well as create a button allowing you to close the popup.
There are two different approaches to adding your content. Appending it directly, or loading it from a external file (such as an html file).
I will go over how to do both methods.Method 1: Appending Code Directly
-
To append code to your popup, make a .append jquery call on the innerDiv we created earlier (innerOverlay), and provide your desired content. For example:
$("#innerOverlay").append('<label>This is my Content</label><input id='ButtonClose' type='button' value='Close' onclick='overlay()''>');
Method 2: Loading An External File
-
To load a file into your popup, make a .load jquery call on the innerDiv we created earlier (innerOverlay), and pass in the file location.
This example uses a file called myPopupContents which has been added into a folder within the project called "Content". Here is an example:
$("#innerOverlay").load("/Content/myPopupContent.html", function() {
appendButton();
});
(You do not need to add an appendButton function if you are using Method 1. For reference on how to make your close button though, look at the next section).
Method 1 simply adds it's close button to the end of whatever it appends, while Method 2 creates a function which calls appendButton() within.
Method 2 runs asynchronously and also wipes out everything within innerOverlay when the load is called.
Thus, you create a function within the load of Method 2 that will be called once the load completes. Allowing you to create your button over all of your newly loaded content.
How the appendButton function works will be discussed in the next step.

-
To append code to your popup, make a .append jquery call on the innerDiv we created earlier (innerOverlay), and provide your desired content. For example:
Creating an Open and a Close Button
-
Next you will make the button that will open your popup. Of course you can use whatever method of initiating the popup you like. Just as long as you call the overlay() function we made earlier.
The open button is simple. Simply add an <input> tag wherever you like on the page and make sure it's onclick event calls the overlay() function we made earlier. For example:
<input id="ButtonOpen" type="button" value="Open" onclick="overlay()" />
-
The last thing you need to add before your popup is complete, is a button to close it once it is open.
To do this, simply create the appendButton function and inside make a .prepend jquery call on the innerDiv (innerOverlay), and pass in an <input>.
This <input> will conatin an onclick event call to the overlay() function we made earlier. For example:
$("#innerOverlay").prepend("<input id='ButtonClose' type='button' value='Close' onclick='overlay()' style='float:right;'>");

